 Pin
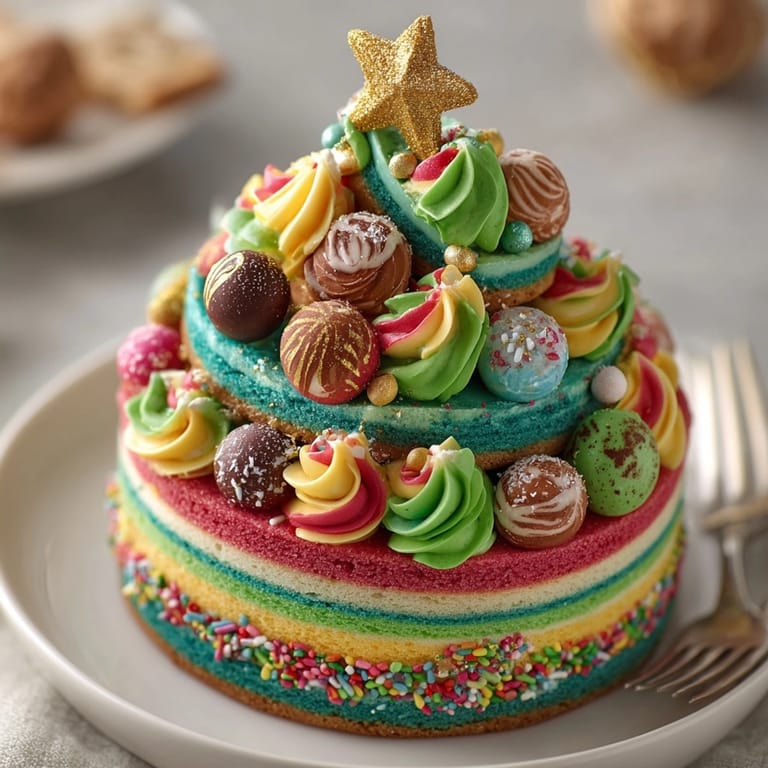
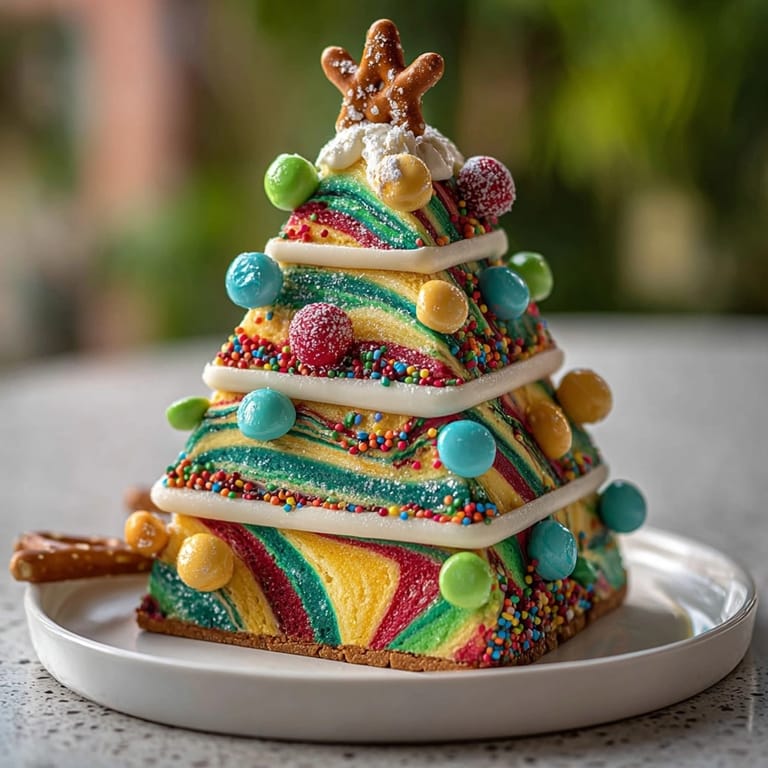
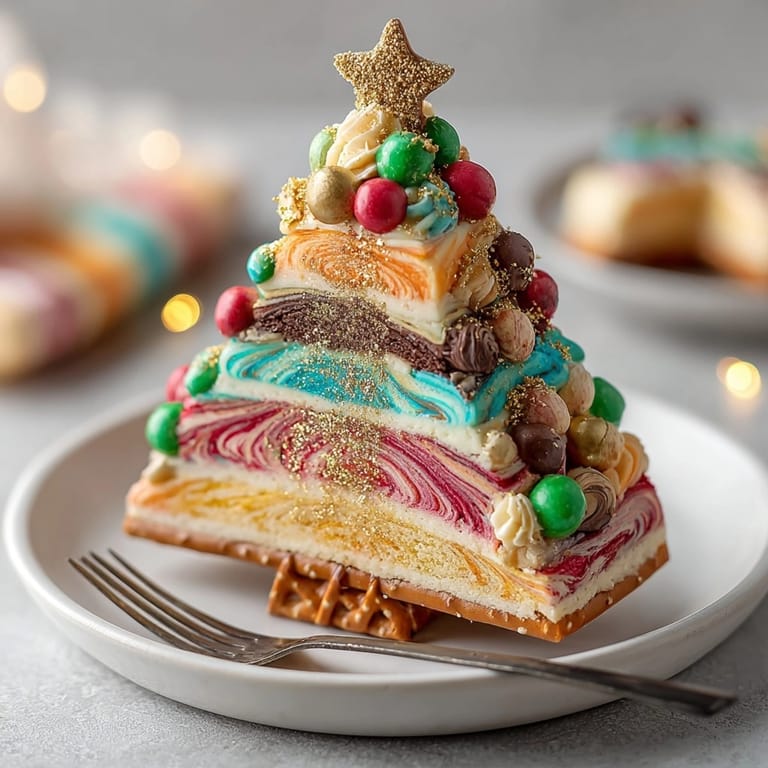
Pin This vibrant Chaos Cake Christmas Tree Swirls has become my signature holiday centerpiece, turning ordinary cake layers into a whimsical, colorful Christmas tree that never fails to draw gasps when unveiled at parties. The deliberately crooked stacking and swirled buttercream create that perfect 'controlled chaos' that makes this dessert both artistic and approachable.
I first created this cake when my nieces and nephews were visiting during a snowstorm, and we needed an indoor activity. What started as a fun distraction has become our most requested holiday tradition, with each child claiming their own section to decorate.
Ingredients
- All purpose flour: creates the perfect sturdy yet tender base for our cake layers
- Baking powder: gives just the right lift without making the layers too delicate for stacking
- Unsalted butter: provides rich flavor and proper texture look for European style for extra richness
- Room temperature eggs: ensure proper emulsion and even texture throughout the batter
- Gel food coloring: delivers vibrant colors without thinning the batter like liquid colors would
- Whole milk: adds necessary moisture and fat for a tender crumb
- Edible glitter and festive sprinkles: transform a simple cake into a magical creation
Tired of Takeout? 🥡
Get 10 meals you can make faster than delivery arrives. Seriously.
One email. No spam. Unsubscribe anytime.
Instructions
- Prepare the pans:
- Preheat oven to 350°F and prepare your graduated cake pans. This recipe uses three 6-inch, two 4-inch, and one 3-inch round pans. If you don't have all these sizes, you can bake in batches. The key is creating different sized layers for the tree effect. Line each pan with parchment and grease thoroughly to ensure easy removal.
- Mix the dry ingredients:
- Whisk together the flour, baking powder, and salt in a medium bowl until evenly distributed. This step prevents clumping and ensures your leavening agent is evenly distributed throughout the batter.
- Cream butter and sugar:
- Beat the room temperature butter and granulated sugar for a full 3 to 4 minutes. Many bakers rush this step, but this extended creaming creates tiny air pockets that give your cake its light texture. The mixture should be noticeably lighter in color and fluffy when done.
- Add eggs and vanilla:
- Incorporate eggs one at a time, allowing each to fully integrate before adding the next. This prevents the batter from breaking or becoming lumpy. Add the vanilla extract last for maximum flavor impact.
- Combine wet and dry ingredients:
- Add the flour mixture in three additions, alternating with milk, always starting and ending with flour. This method prevents gluten development which would make your cake tough. Mix just until combined after each addition, using a gentle folding motion toward the end.
- Color the batter:
- Divide the batter equally among four bowls and add different gel food coloring to each. The key is using gel rather than liquid coloring which would alter the batter consistency. Create vibrant, saturated colors for the most dramatic effect.
- Create the marble effect:
- Pour colored batters into prepared pans, then use a skewer or knife to create swirls. Don't overmix or you'll lose the distinct color separation. Just 3-4 gentle swirls will create beautiful marbling.
- Bake the cakes:
- Bake for 25-30 minutes, checking the smaller pans earlier as they'll bake faster. The cakes are done when a toothpick inserted in the center comes out clean with a few moist crumbs. Allow to cool in pans for exactly 10 minutes before transferring to cooling racks.
- Prepare buttercream:
- Beat room temperature butter until smooth and creamy before gradually adding sifted powdered sugar. Add milk, vanilla, and salt, beating until light and fluffy. Divide and color portions with gel food coloring to match or complement your cake colors.
- Stack and frost:
- Level each cake layer if needed, then stack from largest to smallest with buttercream between each layer. The magic happens when you deliberately offset each layer slightly for that whimsical, tilted tree effect. Don't aim for perfection here chaos is part of the charm.
- Pipe decorative branches:
- Using a star or round piping tip, create swirling, abstract buttercream branches around the stacked layers. Alternate colors for a festive look. Vary your pressure on the piping bag to create different textures and branch thicknesses.
- Decorate your tree:
- Add edible glitter, candies, and Christmas sprinkles as ornaments. Place heavier decorations near the base and lighter ones toward the top. Consider adding a pretzel stick trunk at the bottom for the finishing touch.
 Pin
Pin The gel food coloring is truly the secret weapon in this recipe. After years of disappointment with liquid colors that faded during baking, I discovered that gel colors maintain their vibrancy through the heat of the oven. My favorite brand is AmeriColor because their colors stay true without adding any flavor to the cake.
Make-Ahead Options
This showstopper can be partially prepared in advance to make your holiday entertaining easier. The cake layers can be baked up to two days ahead and wrapped tightly in plastic wrap once completely cooled. Store at room temperature or refrigerate if your kitchen is warm. The buttercream can also be made a day ahead and stored in an airtight container in the refrigerator. Let it come to room temperature and rewhip before using to restore its fluffy texture. I actually find the colors deepen slightly when the buttercream rests overnight, giving an even more vibrant finished tree.
For maximum impact, assemble and decorate the cake the same day you plan to serve it. The visual wow factor is most impressive when the decorations are fresh and the buttercream hasn't had time to crust over.
Troubleshooting Tips
If your cake layers are doming too much during baking, which can make stacking tricky, try using cake strips around your pans. These simple fabric strips, soaked in water and wrapped around the outside of the pan, help the cake bake more evenly.
For stable stacking of offset layers, insert a dowel through all layers after assembly. This hidden support will prevent any sliding disasters, especially if transporting the cake. Just remember to remove it before serving or warn guests about its presence.
If your buttercream becomes too soft while decorating, place it in the refrigerator for 10-15 minutes to firm up slightly. Working in a cool kitchen also helps maintain the perfect piping consistency.
Creative Variations
Holiday Color Schemes: Create different seasonal versions by changing your color palette. Think pastels for Easter, orange and black for Halloween, or red, white, and blue for patriotic celebrations.
Flavor Infusions: Add extracts like peppermint, almond, or orange to the cake batter or buttercream for complementary holiday flavors.
Themed Decorations: Customize your tree decorations based on recipients' interests. Use miniature sports equipment candies for sports fans or tiny fondant music notes for musicians.
The beauty of this chaos cake concept is that it embraces imperfection. Each creation becomes a unique expression of joy and creativity, which is what holiday baking should be all about.
Serving Suggestions
Serve this showstopper cake on a large platter dusted with powdered sugar 'snow' for maximum effect. Position it as your table centerpiece before cutting, allowing guests to admire your creation.
When it comes to cutting, treat each layer as its own cake, removing them one at a time from top to bottom. This makes serving much more manageable than trying to cut through the entire stacked creation at once.
Pair slices with vanilla bean ice cream or a dollop of lightly sweetened whipped cream to balance the sweetness of the buttercream. A warm mug of spiced apple cider or hot chocolate makes the perfect accompaniment for this festive dessert.
 Pin
Pin Success Stories
Every year I receive photos from readers who have made their own versions of this cake. One family turned it into an annual competition, with each member decorating their own mini chaos tree. Another baker created a wedding version with sophisticated metallics and winter white colors that was absolutely breathtaking.
The most touching story came from a mother whose child with sensory processing issues found great joy in the deliberately messy decorating process. For once, there was no 'wrong way' to decorate, and the child felt immense pride in contributing to the family's holiday celebration.
These stories remind me that baking is about so much more than following precise instructions. It's about creating memories, expressing creativity, and bringing joy to those we love during special moments.
Recipe FAQ
- → How do I achieve vibrant colored cake layers?
Use gel food coloring for intense, even shades. Divide batter and tint each portion before swirling together for marbled effect.
- → What if I don’t have all the specific pan sizes?
Bake multiple layers in similar sizes or trim baked cakes to create the desired tiered effect for the tree shape.
- → Can I make the layers ahead of time?
Yes, bake layers in advance and wrap tightly once cooled. Store at room temperature for up to 24 hours or freeze up to a month.
- → Which candies and toppings work best for decoration?
Use gumdrops, mini chocolate balls, edible glitter, and Christmas-themed sprinkles. Get creative with your favorite festive toppings.
- → How do I prevent colors from blending into each other?
Swirl colored batters gently with a skewer and avoid overmixing to maintain defined layers and vibrant cake colors.