 Pin
Pin A friend handed me a packet of hojicha tea during a rainy afternoon, insisting I'd understand why Japanese grandmothers brew it constantly once I tasted it. That roasted, almost smoky-sweet flavor stayed with me through the evening, and I found myself wondering what would happen if I pulled those whispered notes into something silky and creamy instead of a simple cup. Panna cotta felt like the obvious answer, but it wasn't until I actually made it that I realized how the tea's gentle warmth transforms into something almost luxurious when suspended in cream.
I made this for a small dinner party where everyone was tired of heavy chocolate endings, and watching people's faces when they tasted that first spoonful was worth every careful minute spent steeping the tea. Someone asked if it was expensive to make, which made me laugh because the entire dessert costs less than a fancy coffee, yet it tastes like something you'd find at a high-end restaurant that specializes in quiet elegance.
Ingredients
- Heavy cream (1 1/2 cups): This is your foundation, and don't skimp on quality here because the subtle tea flavor needs a luxurious backdrop to shine.
- Whole milk (1/2 cup): This tempers the heaviness and lets the hojicha flavor come through without feeling overly rich.
- Granulated sugar (1/4 cup): Keep it measured precisely; too little tastes flat, too much masks the tea's delicate notes.
- Hojicha loose leaf tea (2 tablespoons): Loose leaf gives far better flavor than bags, but bags work in a pinch if you squeeze them properly.
- Powdered gelatin (2 teaspoons): This is your silent partner in creating that perfect wobble and silky set.
- Cold water (2 tablespoons): The gelatin needs this cold bath before it can do its magic.
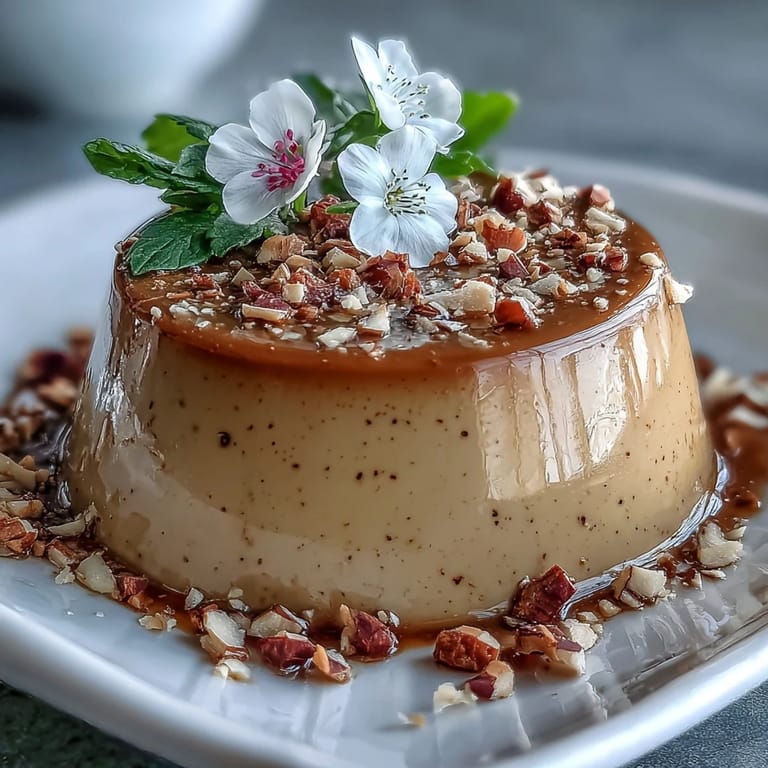
- Optional garnishes: Whipped cream, shaved chocolate, or edible flowers make it feel special without adding fuss.
Tired of Takeout? 🥡
Get 10 meals you can make faster than delivery arrives. Seriously.
One email. No spam. Unsubscribe anytime.
Instructions
- Wake up the gelatin:
- Sprinkle it over cold water in a small bowl and let it sit for exactly 5 minutes, watching as it absorbs the water and becomes spongy. This blooming step is non-negotiable if you want smooth, lump-free results.
- Build your cream base:
- Pour the heavy cream and milk into a saucepan with the sugar, then heat gently over medium-low heat until wisps of steam rise from the surface. You're aiming for hot but not boiling, which means if you see bubbles at the edges, turn the heat down immediately.
- Steep the tea:
- Remove the pan from heat, add your hojicha, and let it sit undisturbed for 7 to 8 minutes. The aroma that fills your kitchen during these quiet minutes is honestly part of the magic.
- Strain with intention:
- Pour the mixture through a fine-mesh sieve into a clean bowl, using the back of a spoon to gently press the tea leaves and coax out every bit of flavor. Don't rush this step; patience here rewards you with a crystal-clear result.
- Reheat and dissolve:
- Return the strained cream to the saucepan and warm it again until it's gently steaming, then whisk in your bloomed gelatin. Keep whisking for a full minute to ensure it dissolves completely and there are no hidden lumps waiting to surprise you.
- Pour and cool:
- Divide the mixture evenly among your 4 ramekins or glasses, then let everything come to room temperature on the counter. This step prevents thermal shock that could mess with the gelatin's setting.
- Chill and set:
- Cover the ramekins with plastic wrap and refrigerate for at least 4 hours, though overnight is honestly better if your schedule allows it. You'll know it's ready when the surface feels gently firm but still yields slightly to a light touch.
- Serve with flair:
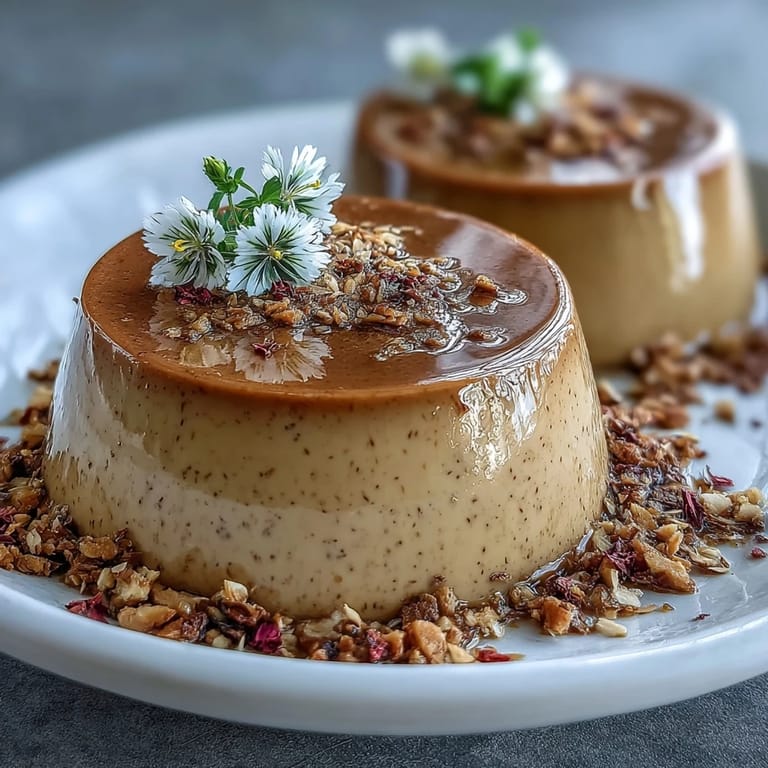
- You can run a thin knife around the edges and unmold onto plates, or simply serve it right in the glass with a spoon. Top with whipped cream, chocolate shavings, or edible flowers if the mood strikes.
 Pin
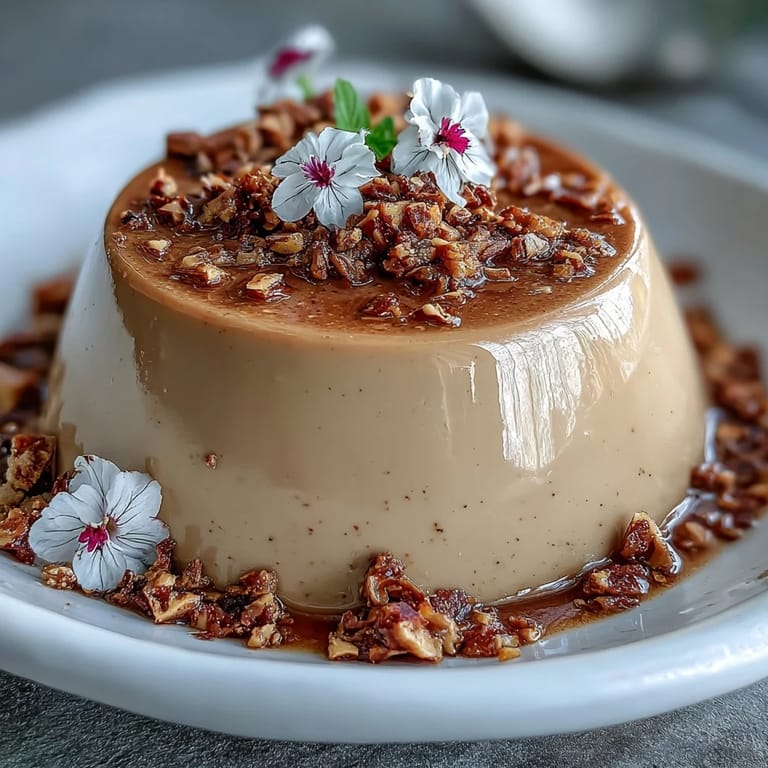
Pin There's a moment right before serving when you remove the plastic wrap and see that glossy surface, perfectly set, and you know you've created something that tastes refined without requiring years of practice. That's when this dessert stops being a recipe and becomes proof that elegance doesn't need to be complicated.
The Secret to Silky Texture
The key to panna cotta that feels like luxury on your tongue is blooming your gelatin separately, never adding it directly to hot liquid. I learned this the hard way when a lumpy batch taught me that this extra step transforms the entire experience, turning what could be rubbery into what feels impossibly smooth.
Hojicha Variations Worth Trying
Once you master the basic version, you can play with intensity by using slightly less hojicha for something more delicate, or doubling down for a deeper roasted flavor that leans almost into caramel territory. I've also experimented with adding a whisper of vanilla extract or a tiny pinch of cardamom, which creates an entirely different experience while keeping the foundation intact.
Timing and Make-Ahead Magic
This dessert actually improves with time, so making it a full day ahead lets the flavors settle and develop in ways that last-minute versions never quite achieve. You can refrigerate it for up to 3 days, which makes it perfect for entertaining when you want to eliminate stress from the evening.
- Prepare everything up to 4 hours before guests arrive and spend the final moments garnishing instead of panicking.
- If unmolding, warm your serving plates so the panna cotta slides elegantly rather than sticking.
- Keep extra hojicha tea brewed and chilled on hand to serve alongside, which doubles down on the flavor experience.
 Pin
Pin This panna cotta taught me that sometimes the simplest dishes, made with real care and quality ingredients, become the ones people remember long after the meal ends. That's the kind of dessert worth making.
Recipe FAQ
- → What does hojicha taste like?
Hojicha has a distinctive roasted, earthy flavor with notes of caramel and minimal bitterness. Unlike other green teas, the roasting process gives it a warm, toasty character that pairs beautifully with creamy desserts.
- → Can I make this vegan?
Yes. Substitute coconut cream and milk for the dairy products, and replace gelatin with agar-agar powder. You may need to adjust the agar quantity slightly and the texture will be slightly firmer but still delicious.
- → How far ahead can I prepare this?
You can make this up to 2 days in advance. Store covered in the refrigerator and garnish just before serving. The flavors actually develop and improve after resting overnight.
- → Why did my panna cotta not set properly?
This usually means the gelatin wasn't fully dissolved or the mixture was too hot when adding the gelatin. Ensure the cream mixture is warm but not boiling when whisking in the bloomed gelatin.
- → What can I use instead of ramekins?
Wine glasses, small mason jars, or even silicone molds work well. Serving glasses eliminate the need to unmold, creating an elegant presentation with less effort.
- → Can I use hojicha tea bags instead of loose leaf?
Absolutely. Use 3 standard tea bags equivalent to 2 tablespoons loose leaf. The flavor may be slightly less intense, so consider steeping for the full recommended time.